On 2016-08-01 a law came into force, allowing customers in Germany to use any internet router they want, as long as it meets the providers requirements.
On that day I decided to buy a Fritz!Box 6490, for three reasons:
1. I wanted to replace the crappy router my provider gave me (which didn't even have WiFi)
2. besides its routing function, it is able to stream up to 4 concurrent TV programs into the Network
3. it was the only device that fulfilled the above-mentioned requirements.
I wanted to setup [Tvheadend](https://tvheadend.org/) to act as an intermediate between clients and the router, because it would allow me to have an EPG, stream the same program to 2 clients, while only occupying a single stream of the Fritz!Box, and allow me to record TV shows.
As you can see from the date of this post, it took me one year to figure out how to do it.
# Prerequisites
I am using Tvheadend (Build:  If you are using the repeater, this is okay. The Fritz!Box however reports a wrong number of tuners. To get all 4 tuners, just set
4.0.9-16~g63c1034~xenial) on a virtual Debian 9.1.0 (x86) with 2GB RAM, 2 vCPUs and 10GB disk together with a Fritz!Box 6490 with Fritz!OS 6.83. This tutorial however should also work with an AVM FRITZ!WLAN Repeater DVB-C (note that the repeater only allows 2 concurrent streams).
To use the full potential of the Fritz!Box you either need 4 network cards ((which is what I did, because my machine is virtual so adding a NIC is just a mere mouse click)) or add sub-interfaces to your main network interface. This is due to the fact that the Fritz!Box only allows one stream per IP address. If you are okay with just one stream for your Tvheadend box you don't need this.
Adding sub-interfaces is as easy as adding this to your /etc/network/interfaces:
auto eth0:1
iface eth0:1 inet static
address 192.168.1.5
netmask 255.255.255.0
broadcast 192.168.1.255

auto eth0:2
iface eth0:2 inet static
address 192.168.1.6
netmask 255.255.255.0
broadcast 192.168.1.255

auto eth0:3
iface eth0:3 inet static
address 192.168.1.7
netmask 255.255.255.0
broadcast 192.168.1.255
apt install dirmngr
apt-key adv --keyserver hkp://keyserver.ubuntu.com:80 --recv-keys 379CE192D401AB61
echo "deb https://dl.bintray.com/tvheadend/deb xenial stable" | tee -a /etc/apt/sources.list
apt update
wget http://security.debian.org/debian-security/pool/updates/main/o/openssl/libssl1.0.0_1.0.1t-1+deb8u6_i386.de
dpkg -i libssl1.0.0_1.0.1t-1+deb8u6_i386.deb
apt install tvheadend
/etc/init.d/tvheadend, find the line reading ARGS="-f" and append something like --satip_xml http://192.168.1.1:49000/satipdesc.xml within the quotes. save the file and restart Tvheadend.
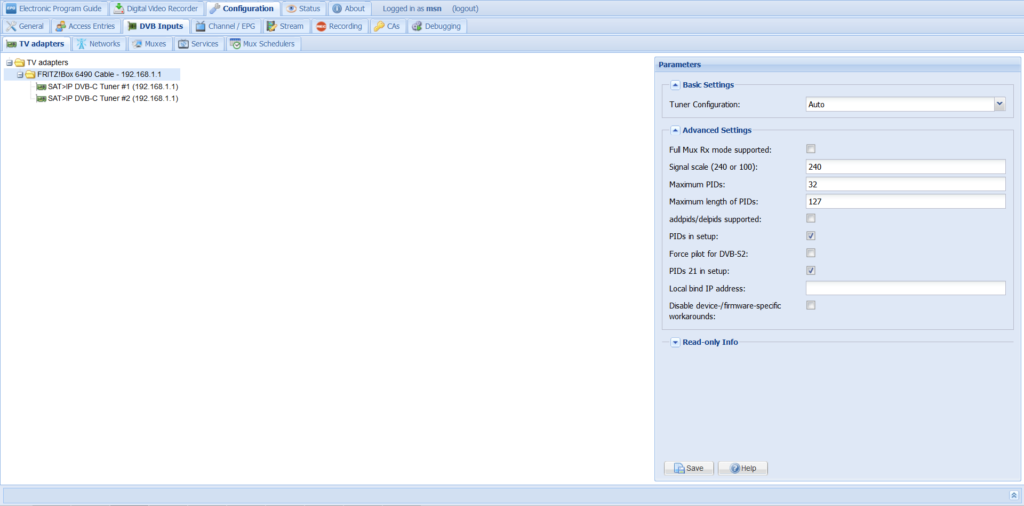
Open up your new TVheadend web interface by pointing your Browser to http://192.168.1.5:9981, and go to Configuration → DVB Inputs → TV adapters. You should see something like this:
 If you are using the repeater, this is okay. The Fritz!Box however reports a wrong number of tuners. To get all 4 tuners, just set
 Tuner Configuration from Auto to DVBC-4.
Next, go to the Network tab and add a new DVB-C Network. Name it however you want and make sure to select your cable provider in the Pre-defined Muxes field. Now go back to the TV adapters tab and change the following settings for each tuner:
- Enabled: checked
- Networks: [the network you just created]
- Next tune delay in ms (0-2000): 500
- Tuner bind IP address: [one of your servers 4 IP Adresses. Each tuner needs his own IP!]
Last step: Got to Configuration → Channel/EPG → EPG Grabber. Change EPG scan timeout in seconds (30-7200) to 30 seconds, disable all Modules but EIT: DVB Grabber.
That's it. You can now start scanning for TV channels:
Go Back to the Configuration → DVB Inputs → Networks tab, select your network and press the force scan button. Go to the Muxes tab and watch Scan Status column, until each row says IDLE. For me, this didn't work very well, most rows showed FAIL in the Scan Status cell. For each failed row, do the following: select row, press edit, set Scan Status to ACTIVE, wait for it to go back to IDLE. Now all scan status cells should show OK and you should have a bunch of services in your services tab. Press Map All, select all checkboxes and wait.
Congratulations, your Tvheadend setup is ready to use!
7 Replies to “Using a Fritz!Box 6490 as Tuner for Tvheadend”