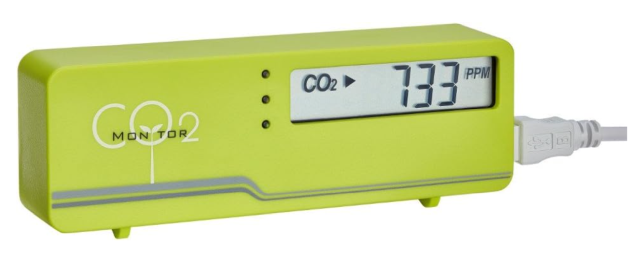
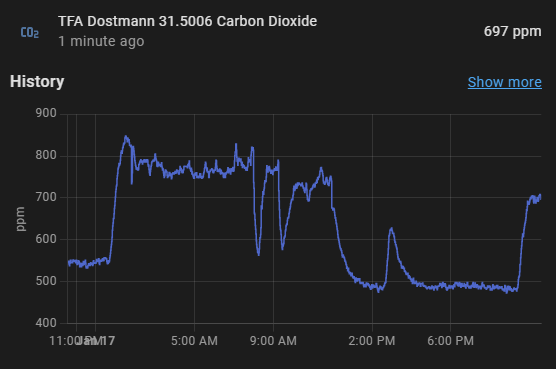
I've been using a Co2 sensor for a long time now to remind myself to regularly open the window and vent the used up air. With my recently newly acquired hobby of home automation, I wanted to get its data into HomeAssistant to _automatically_ switch on the ventilation. This blag post documents my journey with a couple of detours and a bit of hacking.
# Intro
I've been using a "TFA Dostmann CO2-Monitor AIRCO2NTROL Coach, 31.5009" which was recommended by a couple of people and also seems to have reasonable reviews online:
 And my workflow so far was pretty straight forward: "display turns yellow/red -> get up and open the window". My new office has a ventilation system though, so the workflow changed to "display turns yellow/red -> take mobile phone, open HomeAssistant app, select the toggle for enabling the ventilator". A downside here is that I've oftentimes forgotten to switch it of again (this never happened with the window of course...). Anyway, enough setup: I want to automate this. And for this I need the data from the sensor instead HomeAssistant and not only on the display. I also enjoyed the clear green/yellow/red display communication, so retaining that would be a plus.
# Hardware
The first step is the hardware, I googled around for HomeAssistant-compatible Co2 detectors and ordered one. They are relatively pricey as far as sensor go: 40 EUR for a "SPORTARC Tuya Zigbee Smart 6-in-1" which seems to be pretty China-ware-y:
 The reported values out of that sensor just didn't coincide with the readings from the Dostmann 31.5009 and are overall very unbelievable if you look at historic data:
 I would have expected a less spikey-graph. For example: it doesn't really make sense for the value to oscillate around an arbitrary-seeming baseline of 380 ppm. But I'm not an expert and maybe this is all good and dandy and what I should expect from a Co2 sensor.
To avoid investing more money in inaccurate sensors, I decided to research if Dostmann also has sensor that can be read programmatically. But the answer sadly seems to be "No". BUT there is one model, the "31.5006", which is not only powered through USB but also can be persuaded into emitting some data. All un-documented of course but I've not chosen HomeAssistant as a platform to have a seamless end-user experience.
 # Software
This section will only cover the "low level" software where we interact with the sensor via USB. I connected the sensor to a RaspberryPi and we can now use Python to figure out, which connected device is actually the sensor:
 # References
* Starting Point: https://gist.github.com/librarian/306e06c51fe5f53ded6ebc761580b62b
* Overview and the correct temperature formula: https://hackaday.io/project/5301-reverse-engineering-a-low-cost-usb-co-monitor/log/17909-all-your-base-are-belong-to-us
* Python code: https://github.com/heinemml/CO2Meter/blob/master/CO2Meter.py
* Available values for
 And my workflow so far was pretty straight forward: "display turns yellow/red -> get up and open the window". My new office has a ventilation system though, so the workflow changed to "display turns yellow/red -> take mobile phone, open HomeAssistant app, select the toggle for enabling the ventilator". A downside here is that I've oftentimes forgotten to switch it of again (this never happened with the window of course...). Anyway, enough setup: I want to automate this. And for this I need the data from the sensor instead HomeAssistant and not only on the display. I also enjoyed the clear green/yellow/red display communication, so retaining that would be a plus.
# Hardware
The first step is the hardware, I googled around for HomeAssistant-compatible Co2 detectors and ordered one. They are relatively pricey as far as sensor go: 40 EUR for a "SPORTARC Tuya Zigbee Smart 6-in-1" which seems to be pretty China-ware-y:
 The reported values out of that sensor just didn't coincide with the readings from the Dostmann 31.5009 and are overall very unbelievable if you look at historic data:
 I would have expected a less spikey-graph. For example: it doesn't really make sense for the value to oscillate around an arbitrary-seeming baseline of 380 ppm. But I'm not an expert and maybe this is all good and dandy and what I should expect from a Co2 sensor.
To avoid investing more money in inaccurate sensors, I decided to research if Dostmann also has sensor that can be read programmatically. But the answer sadly seems to be "No". BUT there is one model, the "31.5006", which is not only powered through USB but also can be persuaded into emitting some data. All un-documented of course but I've not chosen HomeAssistant as a platform to have a seamless end-user experience.
 # Software
This section will only cover the "low level" software where we interact with the sensor via USB. I connected the sensor to a RaspberryPi and we can now use Python to figure out, which connected device is actually the sensor:
def find_first_holtek():
    for dir_name in os.listdir("/sys/class/hidraw/"):
        uevent_file_name = F"/sys/class/hidraw/{dir_name}/device/uevent"
        with open(uevent_file_name, "r") as fp:
            for line in fp.readlines():
                spl = line.strip().split("=", 1)
                if len(spl) != 2:
                    continue
                if spl[0] != "HID_NAME":
                    continue
                if "Holtek" in spl[1]:
                    return dir_name
def check_sum(data: List[int]):
    if ((data[0] + data[1] + data[2]) % 256) != data[3]:
        raise ValueError("Invalid Checksum")

def _decode_value(data: List[int]):
    return (data[1] << 8) | data[2]
device_name = find_first_holtek()
if device_name is None:
    raise RuntimeError("Cannot determine device, is it really plugged in?")
fp = open(F"/dev/{device_name}", "ab+", 0)
fcntl.ioctl(fp, 0xc0094806, b"\x00\xc4\xc6\xc0\x92\x40\x23\xdc\x96")

temperature = None
carbon_dioxide = None
humidity = None
for _ in range(10):
    resp = list(fp.read(5))
    check_sum(resp)
    value = decode_value(resp)
    if resp[0] == 0x50:
        carbon_dioxide = value
    if resp[0] == 0x42:
        temperature = value
    if resp[0] == 0x41:
        humidity = value
    if all(r is not None for r in [temperature, carbon_dioxide, humidity]):
        break
print(temperature, carbon_dioxide, humidity)
python -m venv .venv
source .venv/bin/activate
pip install fastapi[standard] uvicorn

curl "https://gist.github.com/larsborn/6d855a71fb362ca91a36afadf2ade4c1" > fast_co2.py
sudo uvicorn fast_co2:app --host 0.0.0.0 --port 80
{
  "carbon_dioxide": 708,
  "temperature": 22.79,
  "humidity": 0
}
configration.yaml (don't forget to change the IP address to your RaspberryPi's address):
rest:
  - scan_interval: 60
    resource: http://192.168.178.10/
    sensor:
      - name: "TFA Dostmann 31.5006 Temperature"
        unique_id: temperature
        value_template: "{{ value_json['temperature'] }}"
        device_class: temperature
        unit_of_measurement: "°C"
      - name: "TFA Dostmann 31.5006 Humidity"
        unique_id: humidity
        value_template: "{{ value_json['humidity'] }}"
        device_class: humidity
        unit_of_measurement: "%"
      - name: "TFA Dostmann 31.5006 Carbon Dioxide"
        unique_id: carbon_dioxide
        value_template: "{{ value_json['carbon_dioxide'] }}"
        device_class: carbon_dioxide
        unit_of_measurement: "ppm"
 # References
* Starting Point: https://gist.github.com/librarian/306e06c51fe5f53ded6ebc761580b62b
* Overview and the correct temperature formula: https://hackaday.io/project/5301-reverse-engineering-a-low-cost-usb-co-monitor/log/17909-all-your-base-are-belong-to-us
* Python code: https://github.com/heinemml/CO2Meter/blob/master/CO2Meter.py
* Available values for
 device_class: https://github.com/home-assistant/core/blob/559c411dd241db50a8aa30c0f567a3e2c1d8009c/homeassistant/components/sensor/const.py#L74
5 Replies to “My Quest for a Reliable Co2 Sensor in Home Assistant”