I have started to [learn](http://rustbyexample.com/) [rust](http://rust-lang.org), and I am enjoying myself. This is a merge and update on the two fantastic blog posts on [how to setup Visual Studio Code for Rust](https://mobiarch.wordpress.com/2015/06/16/rust-using-visual-studio-code/) and [how to enable debugging](https://sherryummen.in/2016/09/02/debugging-rust-on-windows-using-visual-studio-code/). In my personal opinion, from among [all the available IDE solutions for rust](https://areweideyet.com/), this is the best. Do you want to know more?
Ich habe ((This post is in German and I am not sure if this is even internationally relevant.)) nach etwa einer Stunde die Suche nach einer LaTeX Vorlage für Übungsscheine erfolglos abgebrochen und eine eigene entworfen. Um dem einen oder anderen wissenschaftlichen Mitarbeiter das Leben zu erleichtern ist hier das Ergebnis meiner Mühen. Das ist jetzt natürlich auf die TU Berlin zugeschnitten und verwendet deswegen auch das offizielle TU Berlin Logo, aber es sollte keine große Schwierigkeit darstellen, es an die eigenen Bedürfnisse anzupassen.
Die Verwendung sollte recht selbsterklärend sein. Es druckt pro DIN-A4 Seite zwei Übungsscheine. Wenn die Seite exakt in der Mitte geteilt wird, sollten die Seitenränder passen und in etwa 7mm betragen. In meinen Tests ist das Ergebnis jedenfalls passabel und muss abgesehen vom Trennschnit auf A5 nicht weiter zugeschnitten werden.
I recently noticed that RdrCEF.exe was clocking close to all of my CPU cycles. This is a cloud service built into Adobe Reader DC, which [constantly sends all kinds of information to Amazon](https://forums.adobe.com/thread/1811609). Leaving all the privacy concerns aside, my computer became inoperable by opening a PDF document. Okay, here's how you fix this.
* Download the [Adobe Wizard](http://www.adobe.com/devnet-docs/acrobatetk/tools/Wizard/), most likely [the version for Adobe DC](http://www.adobe.com/devnet-docs/acrobatetk/tools/Wizard/WizardDC/basics.html).
* Put on your robe and your wizard hat.
* Get yourself your preferred [Adobe DC Installer](ftp://ftp.adobe.com/pub/adobe/reader/win/AcrobatDC/1500720033/), and **make sure it's the MSI version**.
* Use the Wizard to open the MSI and do this:
[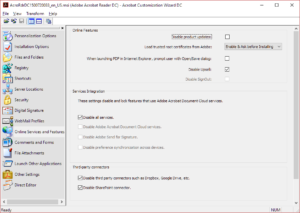](/wp-content/uploads/2016/09/wizard.png)
* Save the MSI and install your new AdobeDC.
Of course, feel free to customize your AdobeDC installer in any other way.
So unless you know and use [git annex](https://git-annex.branchable.com/), this is not going to be very useful for you. Check it out, though. It's pretty cool. Unless you are on Windows. In that case it's hell. Anyway, I wrote a script to help me figure out the output of [git annex unused](http://manpages.ubuntu.com/manpages/wily/man1/git-annex-unused.1.html). In short, it tells you what those files used to be called before you lost them. Script:
#!/usr/local/bin/python3.5
import re, sys, os
from subprocess import Popen,PIPE
FNULL = open(os.devnull, 'w')

def seeker(s):
  process = Popen(["git", "log", "--stat", "-S", s], stderr=FNULL, stdout=PIPE)
  log = process.stdout.read().decode("utf-8")
  match = re.search(r"(([ -~]*\/)*[ -~]*)\|", log)
  if not match: return ''
  else: return match.group(1).strip()

if len(sys.argv)>1:
  print( seeker(sys.argv[1]) )
else:
  clist = []
  while True:
    crawl = input().strip()
    if not crawl: break
    crawl = crawl.split()
    clist.append(crawl)
  for x in clist:
    print('%s : %s' % ( x[0], seeker(x[1]) ) )
You can either call it with one argument which should be a key, or if you call it with no argument, it expects you to paste the list of results you got from git annex unused into stdin. It then goes through the list and tells you the corresponding filename for each key.
This script is phenomenally stupid in that it does quite a terrible regular expression search on the output of git log and returns the first match it finds. Sue me, it works pretty well at my end.
The color that [PuTTY](http://www.putty.org/) uses for blue is simply too dark. The scrollback buffer, by default, is 200 lines. That's ridiculous, I have several gigabytes of RAM going to waste here. In case you have a lot of stored sessions, it's quite tiresome to use PuTTY to go through all of them and fix whatever settings you would like to change. You can edit them directly in the registry, though - or use this Python 3 script!
from winreg import OpenKey, EnumKey, QueryValueEx, SetValueEx, \
  KEY_WRITE, KEY_READ, HKEY_CURRENT_USER as HKCU

class callrange:
    def __init__(self, call_function):
        self.call = call_function
    def __getitem__(self,index):
        try: return self.call(index)
        except OSError: raise IndexError

with OpenKey(HKCU,"SOFTWARE\SimonTatham\PuTTY\Sessions") as sessions:
    for s in callrange(lambda i: EnumKey(sessions,i)):
        with OpenKey(sessions,s,access=KEY_WRITE|KEY_READ) as key:
            for name,value in [
                ('Colour14','100,100,250'),
                ('Colour15','120,120,250'),
                ('TerminalType','xterm'),
                ('ScrollbackLines',6000)
            ]:
                type = QueryValueEx(key,name)[1]
                SetValueEx(key,name,0,type,value)
By the way, searching the tubes reveals [some useful suggestions to improve PuTTY's default settings](http://dag.wiee.rs/blog/content/improving-putty-settings-on-windows).
Ever since I started using Windows 10, it has been creating folders called "Camera Roll" and "Saved Pictures" in the "My Pictures" folder. It was the last straw. Applications had been creating subdirectories in the "My Documents" folder for ages now. Not again. The line must be drawn here. This far, no further. And I will make them pay for what they've done!
Do you want to know more?
Why do I want to? Because I run the incredibly awesome [FreeNAS](http://www.freenas.org/) on a small server, and the jails are FreeBSD. One of those jails is supposed to be a in an N2N VPN, so I can access the files from elsewhere.
Do you want to know more?
Just recently, the latest CyanogenMod nightly began supporting encryption on my phone, even though the bugreport still says it's an open issue. I don't mind. Anyway, this allowed me to finish a major project of mine: Protect the data on my phone, even in the case of a theft, while maintaining the ability to use the device conveniently.
The goal. I want a strong disk encryption password, but i want a weak screen password or PIN, because unlocking the device is a frequent task. In such a scenario, it makes sense to implement an account lockout policy: In other words, we want the phone to shut down after, say, 3 failed attempts to unlock the screen. This prevents the screen password from being brute forced.
Your device needs to be rooted to do everything I did. You will also need the Android studio if you want to do this properly, and it's a large download, you might as well start now. Click here if you're still interested.
I really love Signal, but it is lacking a good Public Key Infrastructure. I hope this is something that the WhisperSystems people are going to be working on in the future, because all the potential is there: The authentication method of scanning QR codes is brilliant, because it is so usable. For now, I have my fingerprint up on my homepage so people can verify it (as long as they believe that I have full control over my homepage).
If you want to get your fingerprint as a QR code image file, this is what you do: Get the qrencode command line tool either through your Linux package manager or through cygwin on Windows. In Signal, choose My identity key from the main menu and type those digits into a file, say textsecure-fingerprint.txt. Then, use this little Python script to generate the QR code:
from base64 import encodebytes
from os import system
d = open("textsecure-fingerprint.txt","r").read().strip().split()
k = encodebytes(bytearray.fromhex(''.join(d)))
system("qrencode -o textsecure-fingerprint.png -l L -t PNG " + k.decode("utf-8"))
And there you go. If someone knows how to get the fingerprint directly from the device, I'd be happy to know that.
So you have a scanned document, and you want to produce a searchable PDF from these images. In my case, I want to digitalize some of my books. There are other tutorials out there, but none of them worked for me. Here's what I did, maybe it helps you.
First, get a debian box and install the packages tesseract (this is the OCR software), xsltproc (dark magic), exactimage (for hocr2pdf) and of course pdftk. Now, take your scan and use scantailor to split it into several neat black and white .tif files, one for each page. Now, create a file called fix-hocr.xsl and put this in it:
Don't ponder on that. It is a dark conjuring that fixes a bug in hocr2pdf. For every .tif file, we now do the following:
* Perform OCR on it, and record the information of where the letters are located in the image. That's what HOCR is all about.
* Do some vodoo with fix-hocr.xsl on the HOCR information from tesseract because tesseract's output causes problems with hocr2pdf, at least it did for me.
* Use the hocr2pdf tool to create a PDF document which contains two layers: One layer of text information and the original tif image above it.
And here's how we do that.
for pg in \$(ls *.tif); do
 tesseract -l eng -psm 1 $pg stdout hocr |
 xsltproc -html -nonet -novalid fix-hocr.xsl - |
 hocr2pdf -i $pg -o "\${pg%%.tif}.pdf";
done
Ignore the warnings about nonclosing ?xml tags, they're bogus. Now you should have tons of searchable pdf pages, let's merge them into a document.
pdftk *.pdf cat output book.pdf;
The document will be huge. Compressing it is a whole different story of pain and awe. What worked pretty good for me was to convert the PDF to PS and then from PS back to PDF and then from that PDF to DJVU:
For 300 dpi files. Somehow, setting the DPI to 299 for pdf2djvu shrunk the file size absurdly, as opposed to 300. My wild guess is that 299 somehow allowed pdf2djvu to actually use its lossy compression, while maintaining the 300 did not. As you can see, I have no actual idea what is happening here, so you will probably have to toy with the options a bit like I did. Another side note: The PDF remained huge no matter what I tried, but I got the DJVU down to about 10kb per page, which would be 2mb for 200 pages.
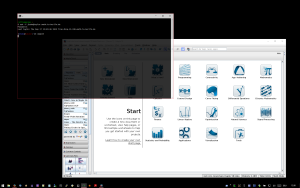
Say you work somewhere where all workstations run Linux, only you have Windows on your laptop, which you basically use all the time. Now as I type this, I am not sure if anyone else shares my fate. Anyway; this does not stop you from running some of the cool Linux tools. Just install CygwinX (through the regular Cygwin installer) and start the XServer from the start menu. Icons will appear in your taskbar and you can start an XTerm. Inside that XTerm, type:
rattle@windows.box$ ssh -Y rattle@linux.box
Password:
Last login: Thu Sep 17 12:43:19 2015 from windows.box

rattle@linux.box$ xmaple
and there you go!
Maple on Windows
The -Y switch is the one that does all the magic, obviously.
Scenario. You have a Windows 7 key and want to farm a Windows 10 key from it, using the automatic upgrade. Of course, you want to do this in a VirtualBox ((Side note. If you have a customized Windows, you possibly need to install Virtual Box 4.3.12 because anything after that will throw an error.)). The first thing you do is, set up a VM with at least 30GB of harddrive. Let's assume that this VM is called Nekarat. This is an outdated pop culture reference, google it.
In the host system (not the VM), go to your happy place (i.e. cmd.exe) and do this:
cd c:\Program Files\Oracle\VirtualBox
VBoxManage.exe setextradata Nekarat VBoxInternal/CPUM/CMPXCHG16B 1
It will not seem like anything has happened, but trust me, it did. It enables a certain CPU instruction for the virtual machine without whome the Windows 10 update fails.
Boot the VM. Install Windows and update it completely. Do not install the VirtualBox Guest additions: The display driver is incompatible with the Windows 10 update. Now might be a good time to make a snapshot if you want to upgrade more than one key. Activate Windows. Then, in the VM, add this to the registry, courtesy of filecritic.com:
Windows Registry Editor Version 5.00

[HKEY_LOCAL_MACHINE\SOFTWARE\Microsoft\Windows\CurrentVersion\WindowsUpdate\OSUpgrade]
"AllowOSUpgrade"=dword:00000001