**Disclaimer:** If you are not running Windows on your host, you might not get anything out of this post. Sorry Tux.
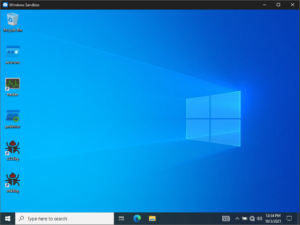
I am convinced that the Windows Sandbox is one of the best virtualization solutions to do dynamic malware analysis (for Windows malware, at least). The reason is quite simple: Distinguishing a Windows 10 Sandbox instance from the actual underlying Windows 10 install should be very difficult for malware. Specifically if the host is running on HyperV with Guarded Host enabled, my current understanding is that there are little to no differences between the two, but they are neatly isolated from one another. The configuration options are limited, but you can easily cook up a config that launches a WindowsSandbox instance that has all the tools you need for some basic unpacking & dynamic analysis. This is what my malware analysis sandbox looks like at launch:
I have successfully executed a number of samples that evade execution in other virtualized environments. That's a far cry from rigorous testing, so take my praise with a grain of salt. Still, it might be worth a try, the setup is really easy. Do you want to see my config?
(English-only readers can safely ignore this post)
I'll be talking at FrOSCon this year again and try to take a stab at a topic that does not _only_ involve technical topics but will also tell the story of a bank heist. This heist wasn't supported by getaway cars and pistols but was solely carried out through cyber-means. The talk is in German though.
* Source Code of LaTex Presentation: https://github.com/larsborn/FrOSCon2021-Ghidra-Bangladesh-Talk
* Handout PDF: FrOSConTalk2021-Ghidra-Bangladesh
* FrOSCon schedule entry: https://programm.froscon.de/2021/events/2670.html
* Recording on media.ccc: https://media.ccc.de/v/froscon2021-2670-der_cyber-bankraub_von_bangladesch
I idly googled for the title and couldn't find code that I can insipidly paste into a console window. So I prepared it here for fellow travelers (and my future self):
wget 'https://github.com/NationalSecurityAgency/ghidra/releases/download/Ghidra_10.0.1_build/ghidra_10.0.1_PUBLIC_20210708.zip'
unzip ghidra_10.0.1_PUBLIC_20210708.zip
sudo apt install default-jdk
./ghidra/ghidraRun
Assume you have an already running Zabbix instance that is able to send notifications – via e-Mail or Signal for example. The goal of this post is, to use such an instance to get notified whenever there is a new release for a software you may have installed on some of your machines.
Do you want to know more?
Create a new directory in
wp-content/themes
— let's call it danktheme
in this example. Create two files in that directory: style.css
and functions.php
with the following contents:
/*
Theme Name: Your Themename
description: Your Description
Author: Your Name
Template: twentytwentyone
Version: 1.0.0
*/
and
<?php
add_action('wp_enqueue_scripts', 'my_theme_enqueue_styles', 11);
function my_theme_enqueue_styles()
{
wp_enqueue_style('danktheme', get_stylesheet_uri());
}
That's it: now you can select "Your Themename" in the admin interface.
If you don't want to use twentytwentyone
as the parent theme — because it's not the most recent one when you read this, for example — replace it in the style.css
. Yes, in the stylesheet, I'm not making this up, rules are rules.
I was always fascinated with the idea of turning ideas into data within a computer and then turning this data into a physical object. With this, I'm probably not alone given that 3D printing is all the rage in nerd world. After some googeling around and buying a printer on Amazon Prime day, I devised the following plan to learn 3D printing as a skill:
1. print sample shape shipped with the printer
2. print model from the internet
3. modify existing model
4. create a model from scratch
The intention behind this plan was to spread out different problems and technologies involves as much as possible. So it's never a daunting task.
Show the steps!
CTFd is a Python-based open-source Capture The Flag (CTF) web app. I wanted to use it in a context where I didn't want to collect email addresses of the registering users. To archive this, I decided to take the easy way and hack myself around the problem: just hide the email-field in the registration form and generate a random address for every registration.
Show me the code!
All right, the last step to complete the great Sourdough Monitoring Project (SMP): capturing actual footage. We don't need a real video but just a sequence of still images. The goal is to collect enough of those on disk to later be able to assemble them into a time-laps video of the dough growing.
First I'll show you how to enable camera support in software, then how to attach the camera, and finally finally how to capture images to disk. As a bonus, I'll share a PHP script you can use to receive images on a server on the internet so you can look at your dough from the other side of the world.
Take a peek.
This is me again, having no idea about electronics and trying to get a Raspberry Pi to record the temperature of its surroundings in order to better control the environment of the previously mentioned sourdough.
Get bakin'!
I want to create a stop motion movie of sourdough growing over night. Don't ask. Since I'm very comfortable with the OS, I am using Raspberry Pi as the hardware platform. And since everyone will tell you that _Lighting_ is important for any kind of filmmaking I played around with ways to toggle power on the USB ports to control USB-powered lamps.
You want to know more? !
I started learning JUnit 4 and encountered the message "1 of 4 branches missed." when testing a code fragment like
x && y
where x
and y
depend on each other in a particular way. Here is my journey and a "solution".
You want to know more? !
Run
grep Revision /proc/cpuinfo
and look it up on https://elinux.org/RPi_HardwareHistory.
For posterity I copied the table by the time of writing...!